
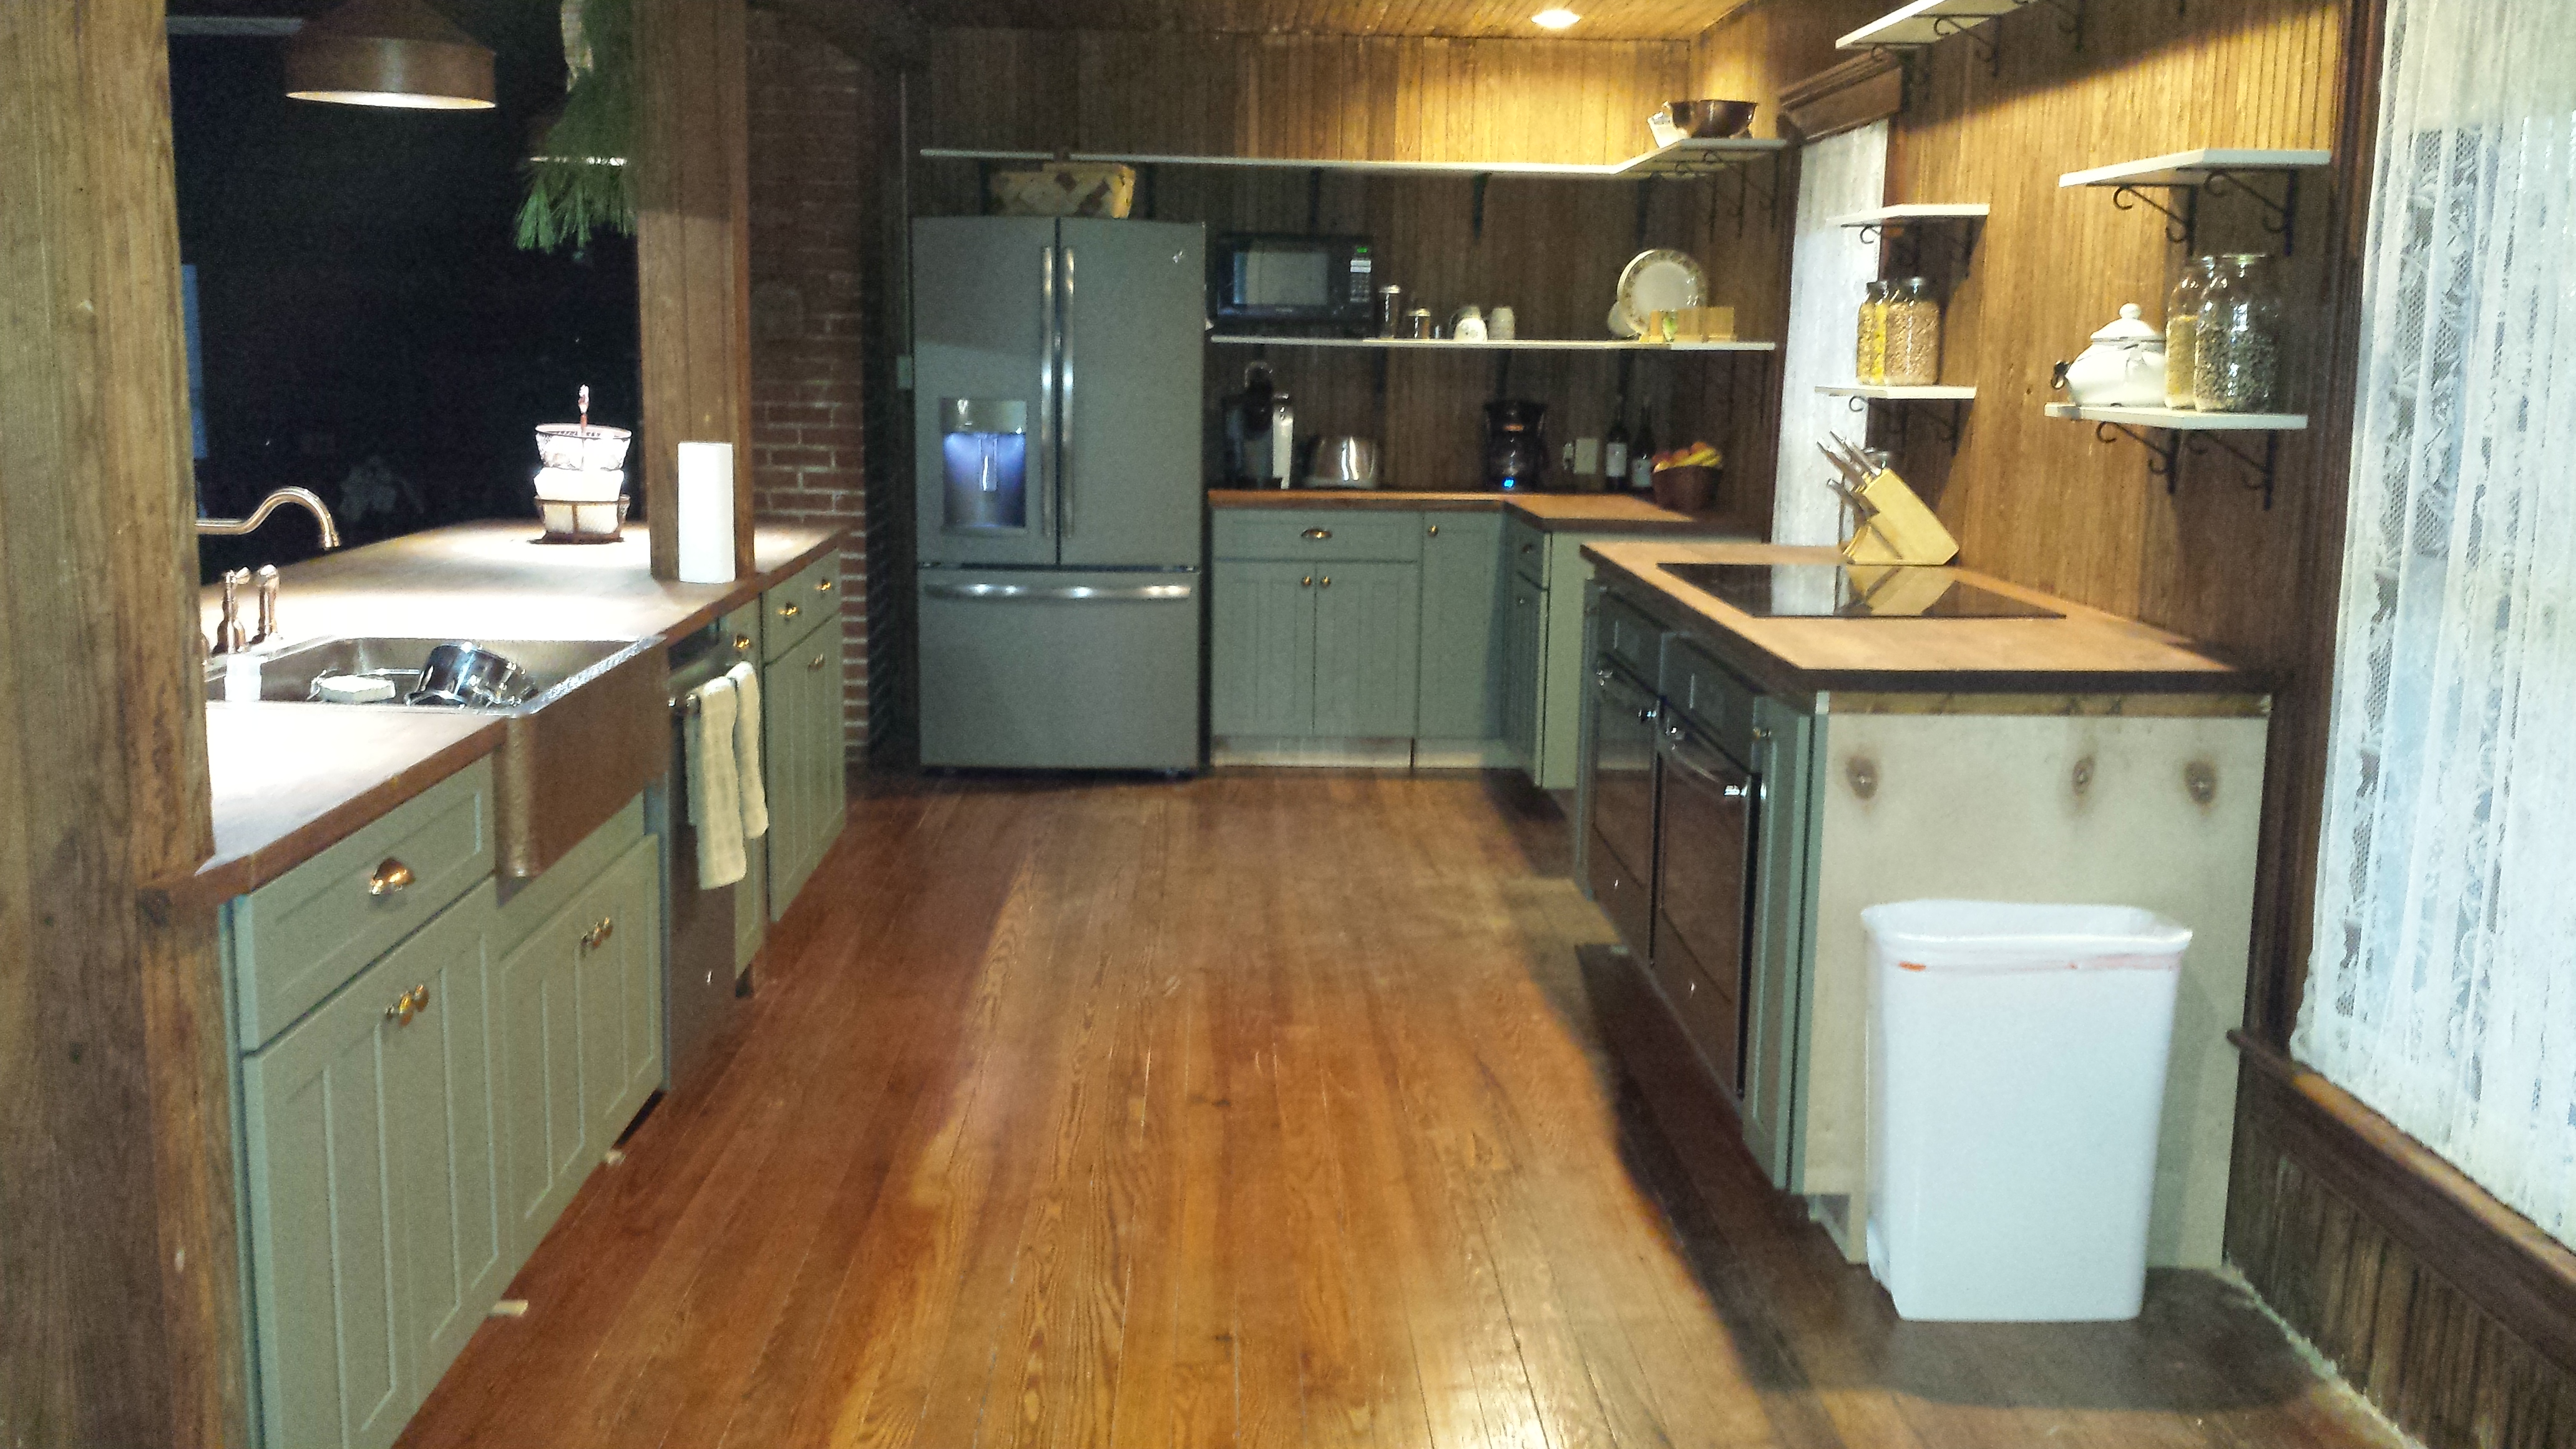
One of the big projects we have been waiting to do is the upstairs kitchen. When we first moved in back in March 2014 we did not have a kitchen upstairs. The old apartment kitchen downstairs was our only one. Three miles round trip (it seemed like) to go get a cup of coffee. It wasn’t bad in the summer but when winter hit things were bad. We would have the wood burning stove and two electric heaters just to keep the room above 40 degrees. After we insulated and Heidi finished the windows we decided to at least create a “winter kitchen” upstairs by moving some counters and doing the plumbing.
Looking at the job I realized the double work of setting up the kitchen twice didn’t make me happy. I suggested we go ahead and build the final kitchen and be done with it. Heidi was skeptical that I could do it before winter hit. I was optimistic that it could be done (but then I am always overly optimistic).
The first challenge was to decide on the layout.
Wait, I forgot something. Back during the summer Heidi said three words I have found out almost always means a bigger job. She said “You were right.” I ask “about what?” I had originally suggested we have an open kitchen facing the living room. She did not agree so when we built the living space upstairs it included a wall enclosing the kitchen area. I took the wall back out, along with all the wiring I had set up for the counter area.
Now back to the job of designing the layout.
We have looked at many different ideas over the past year so now it was crunch time to decide. Once we had the design we needed to decide on cabinets and counter tops.
Here was our final decision:
- Shaker style lower cabinets.
- Open shelves instead of uppers.
- Two built in ovens mounted low.
- Smooth surface cooktop.
- Copper farmhouse sink
- Antique looking faucet.
- Butcher block counter tops.
- We will decide on lighting later but we knew we were going to have pendant lights over the bar and ceiling lights over the over and back counter area.
- Slate color appliances.
We spent a lot of time looking at cabinets, finally deciding on a very nice sage grass green. As soon as they were ordered I starting working on finding butcher block counter tops. The prices were all over the place. One of the challenges was that the bar counter had to be 14’ x 3’. No easy task. My final decision was 5 pieces purchased at Lumber Liquidators and build it myself. I ordered them and picked up two within a week. The others were backordered until November. No problem, the cabinets won’t be in right away so I don’t really need them. November got here and guess what? No countertops. Backordered until middle of December. Now I am in trouble. I promised Heidi I would have the kitchen done so we didn’t freeze. We started looking for other counter solutions. Nothing matched the rustic look we wanted, except a plank countertop. Ok, let’s do that. So, on one of my daily trip to Lowes I picked up 2x10s and 2x12s.
When the time came to build the kitchen I had to take out a wall that separated the kitchen from the bathroom. It was easy since all it was just a single row of beadboard. I built a full wall with insulation and reinstalled the beadboard. I didn’t want to install the plumbing until I had the cabinets in place since I was going to be cutting into the floor upstairs and the ceiling downstairs. When the cabinets were delivered we were able to stage it where we wanted.
I hate plumbing, I hate plumbing. I got the plumbing done without too many foul words but it is still the thing I always dread. I extended the sized of the post cover to hide the water lines and the electrical. It would be easier if the post and cover hadn’t twisted a bit over the last 100 years.

With the cabinets in, it was time to tackle the countertops. My plan was to rip them, glue them and then Heidi can stain them. I researched the best way to do this and discover the Kreg jig kit. This thing is amazing. I was able to make all three countertops. Wait did I say three? I meant we needed three. I made four. Turns out I made the oven countertop exactly the same size as the cabinets with no overhang. Now we have oven countertop version 2.0. If this is the worst problem I have doing this kitchen, then I will be very happy. The 14 footer was going to be so heavy I knew we could not carry it upstairs so I had to build it in the living room. I set up saw horses and an OSB board. It worked well. We were able to slide it from the saw horse right onto the cabinets.
 The scariest part was having to cut out for the sink and the two posts.
 We measured and moved it up to the posts many times to make sure it was right. After what seemed like hours it was ready to slide into place. I attached it to the cabinets and then cut out for the farmhouse sink. Leveling the sink took longer than cutting out holes for the posts. Cutting, sanding, screaming and hammering is what it took. Finally it was level. I attached it and moved on to cutting out for the faucet.
The countertop came out a lot nicer than I expected. It really fit into the look we were trying to get. The next challenge was to decide on the brackets for the shelves. Heidi really wanted ones that matched brackets already here but that was not going to happen. She found a style she liked online made by the Amish. She ordered 48 iron brackets. I was shocked that they were $10 each. I made the wood shelves and Heidi painted them. One of the challenges was the microwave. We did not want it on the counter and we were worried about the weight. The solution was to by a microwave bracket and install it so that it sat right above the shelf. It looks like the microwave is on the self but it really sits on the bracket.
We did not forget the lights. Heidi found a company in Pennsylvania that makes handmade copper pendant lights. These would go over the bar. We still needed a solution for the oven and counter area.

I heard those three words again! I come home from work and Heidi says “Hey, I have an idea. Let put recessed lights over the oven and back counter.” She laughed as soon as she saw my face. Then she said “You were right.” I had suggested this in the beginning. We got recessed lights with copper trim rings. They really look good.
The cabinet maker messed up and didn’t finish some of the ends. John at Lowes took care of it and got the panels ordered. The last part of the project is putting beadboard on the front of the bar. Weather will dictate how soon we can get that part done. This project worried me from the start. Going from an empty shell with no plumbing or electrical to a full kitchen that made Heidi cry will go down as one of the best projects we have ever completed. Christmas dinner using our new kitchen was great!


 Follow


It looks stellar!